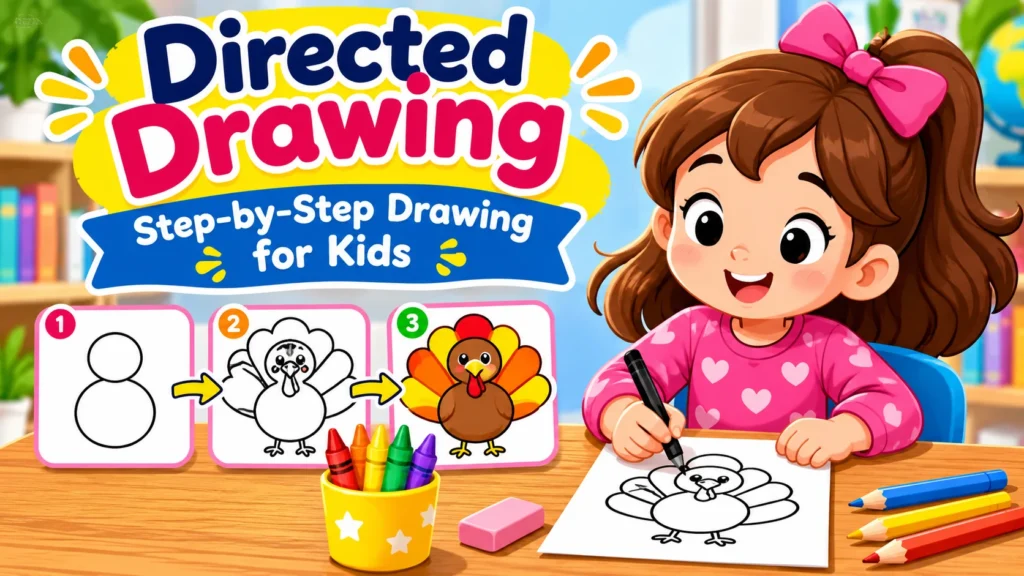
Directed drawing for kids is a fun, beginner-friendly art activity in which children follow step-by-step instructions to create pictures of animals, flowers, vehicles, seasonal objects, and more. It works especially well for preschool, kindergarten, and elementary school students because each small step builds toward a recognizable picture.
Whether you’re planning a quick classroom art lesson, looking for easy drawing activities at home, or preparing holiday projects, these 30 easy directed drawing ideas offer something for every young artist. You’ll also find simple teaching tips, March drawing ideas, Father’s Day drawings, and November art activities.
What Is Directed Drawing?
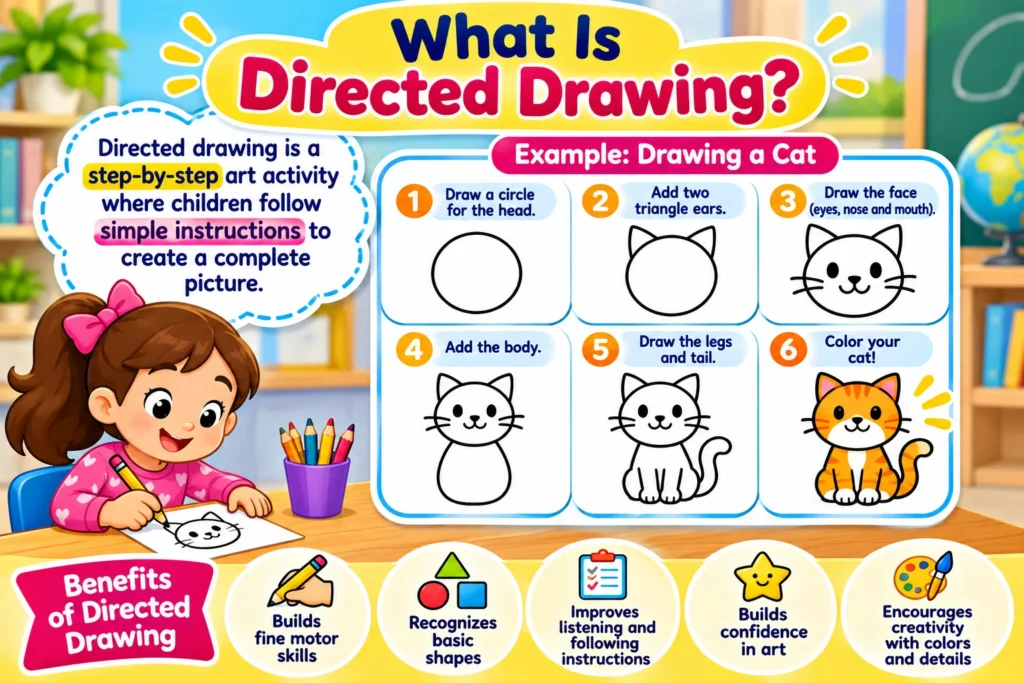
Directed drawing is a guided art activity in which a teacher, parent, or instructor demonstrates how to draw an object using a sequence of simple steps. Children watch each demonstration and recreate the shapes on their own paper.
For example, a teacher might show students how to draw a cat by starting with a circle, adding two triangle ears, drawing a body, and finishing with a face and tail.
Rather than drawing the entire picture at once, children complete one manageable part before moving to the next.
The goal is not to create identical artwork. Directed drawing provides a starting point while allowing children to choose their own colors, patterns, expressions, and background details.
Directed Drawing vs. Free Drawing
Both approaches have a place in children’s art activities.
| Directed drawing | Free drawing |
|---|---|
| Follows demonstrated steps | Begins with children’s own ideas |
| Introduces shapes and techniques | Encourages independent experimentation |
| Provides a clear starting point | Offers open-ended possibilities |
| Useful for teaching specific drawing skills | Useful for exploring personal creativity |
A balanced art routine can include both methods. Children might follow a directed drawing lesson to learn how to sketch a butterfly, then invent their own garden around it.
Benefits of Directed Drawing for Kids
Directed drawing is more than a fun activity for filling classroom time. When used thoughtfully, it gives children opportunities to practice several useful skills.
Develops Fine Motor Skills
Holding a pencil, drawing curves, tracing shapes, and adding small details all involve controlled hand movements. These activities provide practice with the coordination children also use for handwriting and other everyday tasks.
Encourages Creativity
Although the drawing begins with guided instructions, children can make artistic decisions about color, size, texture, and background. A class drawing the same butterfly might create completely different wing patterns.
Helps Children Follow Instructions
Children practice listening, observing, remembering short instructions, and completing actions in sequence. Teachers can make these directions easier by demonstrating one small step at a time.
Builds Artistic Confidence
A recognizable picture can feel encouraging to children who are unsure how to begin drawing. Breaking a complicated image into smaller shapes helps make the activity more approachable.
Supports Shape Recognition
Young learners encounter circles, rectangles, triangles, ovals, curves, and straight lines as parts of familiar objects. Teachers can reinforce this vocabulary while demonstrating each step.
Materials Needed for Directed Drawing
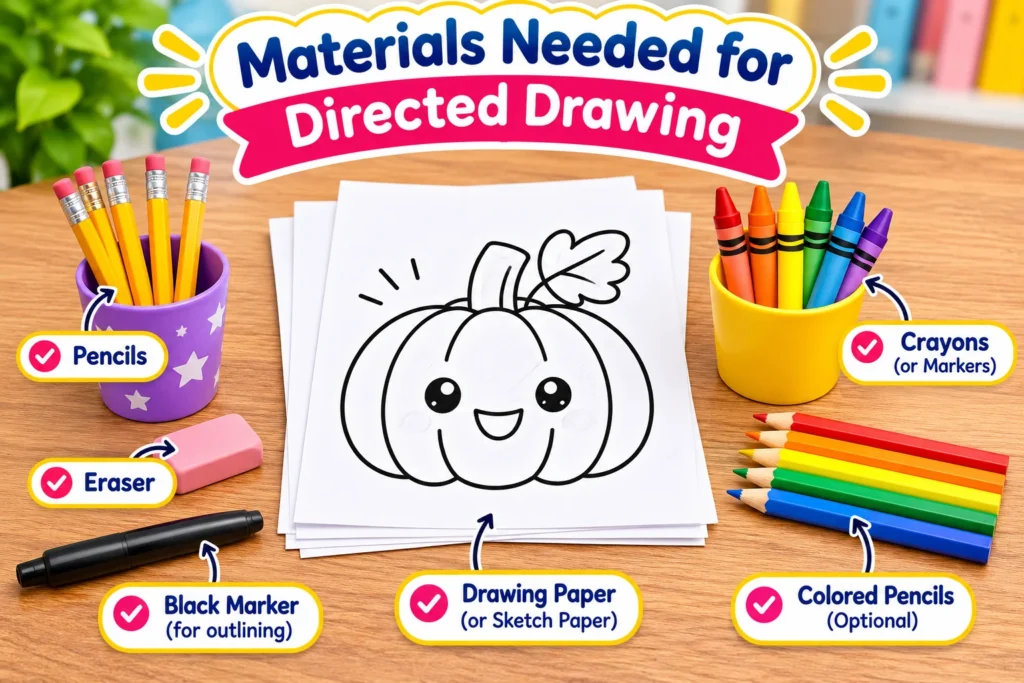
One of the best things about directed drawing is that it requires very few supplies.
Basic materials:
- Plain drawing paper or a sketchbook
- Pencils
- Erasers
- Crayons or colored pencils
- Washable markers
Optional materials: construction paper, watercolor paints, oil pastels, drawing worksheets, and a whiteboard for demonstrations.
For younger children, thick crayons or pencils may be easier to control. Older students can experiment with fine-tip markers and additional details.
Teacher tip: Keep the materials simple during the first lesson. Children can concentrate on drawing before experimenting with additional art supplies.
How to Teach Directed Drawing Step by Step
A successful directed drawing lesson doesn’t require advanced artistic skills. What matters most is demonstrating clearly and allowing children enough time to follow along.
Step 1: Choose an Age-Appropriate Picture
Start with a familiar object that children can recognize easily, such as a sun, flower, fish, or house.
Preschoolers may prefer pictures with three to five basic drawing stages, while older elementary students can manage more detailed instructions.
Step 2: Demonstrate the First Shape
Draw the starting shape slowly on a board or large sheet of paper.
For example, when drawing a flower, begin with a small circle in the middle of the page.
Explain what you are drawing in simple language.
Step 3: Let Children Follow Along
Give students time to recreate the shape before introducing another step.
Avoid rushing to finish the drawing. Some children may need extra time or a second demonstration.
Step 4: Add Details Gradually
Introduce additional lines and shapes to develop the picture.
For the flower, this might include petals, a stem, and two leaves.
Step 5: Encourage Personalization
Once the basic outline is complete, invite children to select their favorite colors or add their own details.
A flower could become part of a garden, a butterfly could land on a leaf, or a smiling sun could appear above a colorful house.
Step 6: Celebrate Different Results
Display the finished drawings or invite children to describe something they added.
Remind students that everyone’s artwork can look different, even when they follow the same instructions.
30 Easy Directed Drawing Ideas for Kids
These drawing activities range from simple preschool illustrations to more detailed seasonal and elementary school projects.
Most can be completed in approximately 5–20 minutes, depending on the child’s age, drawing experience, and coloring choices.
Easy Directed Drawing Ideas for Preschoolers and Kindergarten
The following activities use recognizable objects and basic shapes, making them good starting points for young beginners.
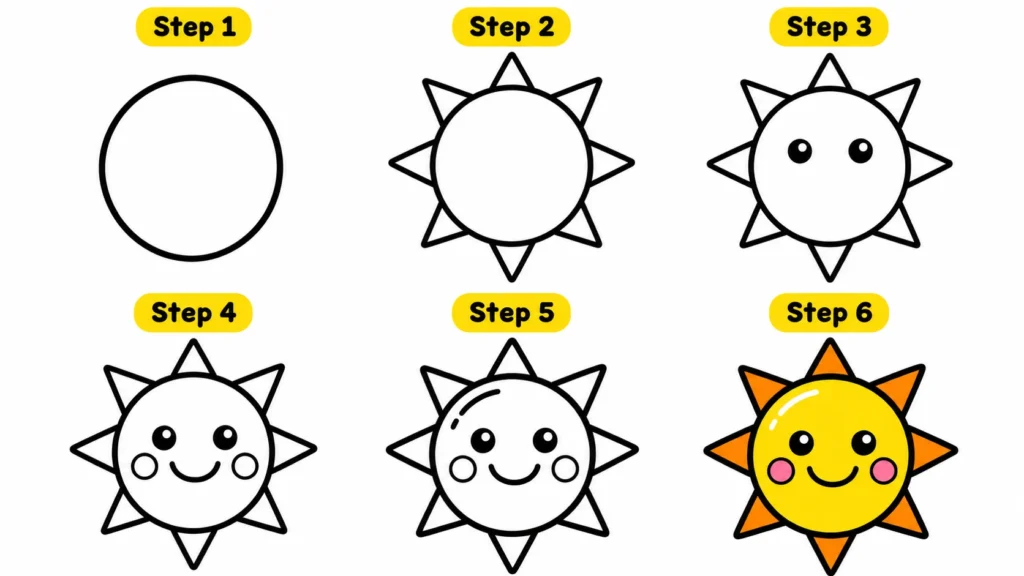
1. Smiling Sun Directed Drawing
Best for: Ages 4–6
Estimated time: 5–10 minutes
Skills practiced: Circles, straight lines, facial expressions
A smiling sun is one of the easiest directed drawing projects for preschool children.
How to draw it:
- Draw a large circle in the middle of the paper.
- Add short straight lines around the circle to create sun rays.
- Draw two small eyes inside the circle.
- Add a curved line for a smiling mouth.
- Color the sun yellow or orange.
Children can draw fluffy clouds, grass, or flowers around their sunshine picture.
Classroom extension: Ask students to describe the weather in their drawing.
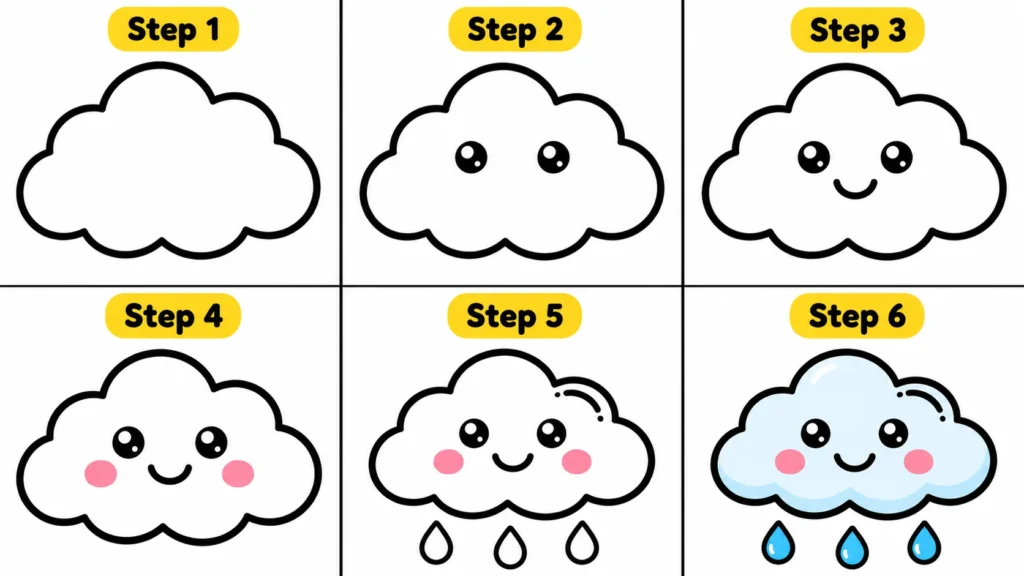
2. Happy Cloud Drawing
Best for: Ages 4–6
Estimated time: 5–10 minutes
This friendly cloud introduces rounded lines and encourages children to practice drawing curves.
How to draw it:
- Draw three connected rounded bumps across the top.
- Add a curved line underneath to close the cloud.
- Draw two small eyes and a smile.
- Add short lines or raindrop shapes below the cloud.
- Color the cloud and surrounding sky.
For a creative variation, children can turn the cloud into a rainy, snowy, or sunny weather scene.
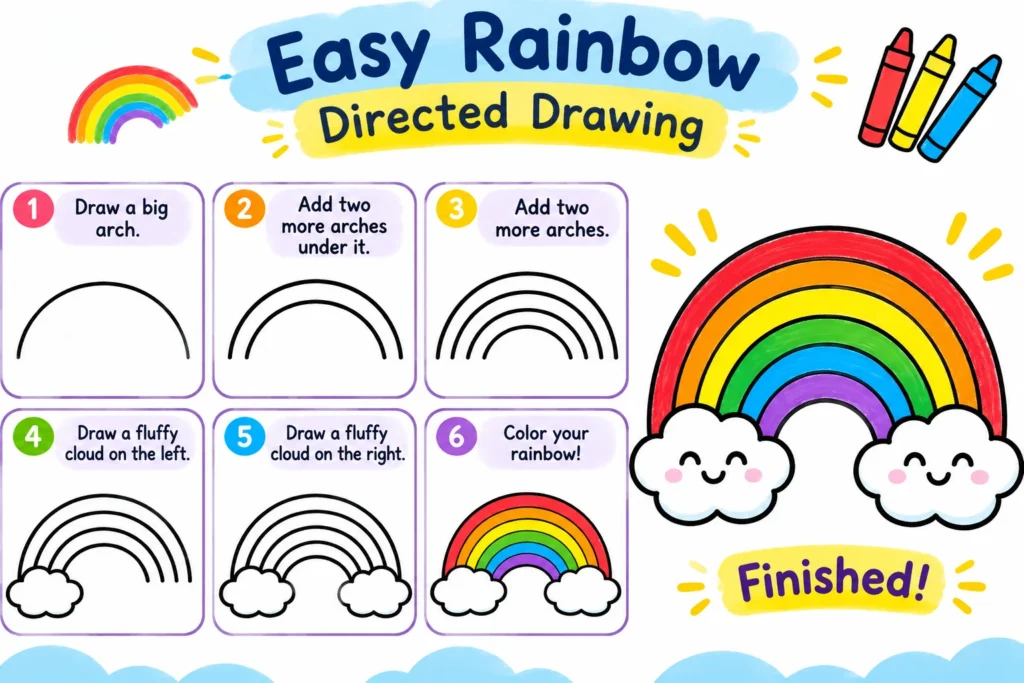
3. Easy Rainbow Directed Drawing
Best for: Ages 4–7
Estimated time: 10 minutes
A rainbow is a colorful introduction to curved lines and repeated shapes.
How to draw it:
- Draw one large curved line.
- Add several smaller curved lines underneath, keeping them roughly parallel.
- Draw a fluffy cloud at each end.
- Color each rainbow band.
- Add a sun, raindrops, or small flowers.
Teachers can use this activity to discuss color recognition and patterns.
4. Simple Flower Directed Drawing
Best for: Ages 4–7
Estimated time: 10–15 minutes
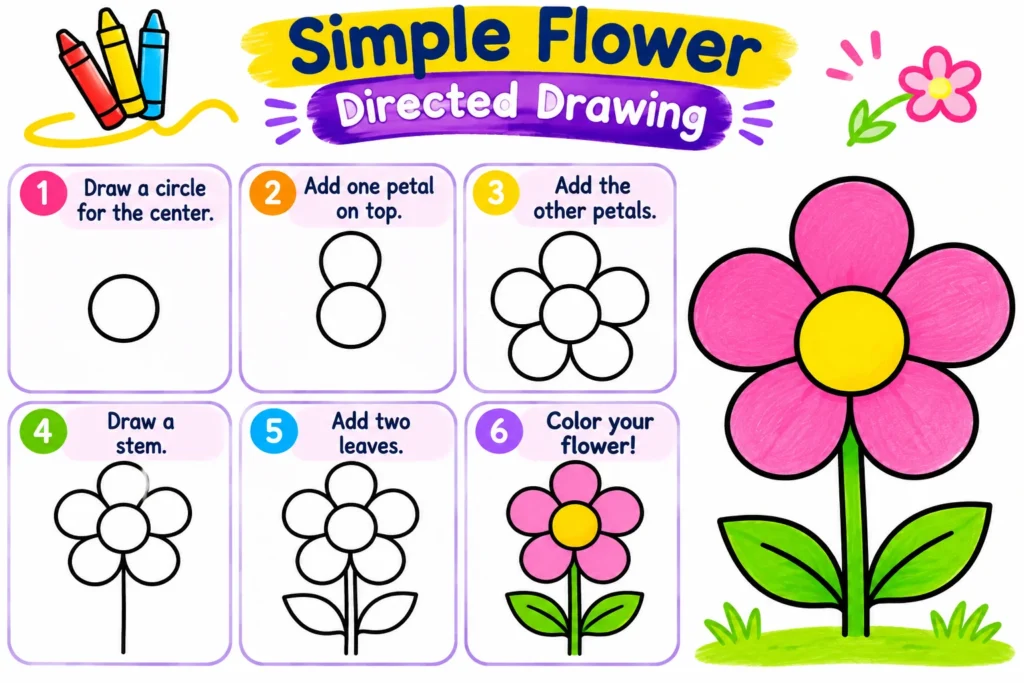
Drawing a flower gives beginners practice combining circles, ovals, and lines.
How to draw it:
- Draw a small circle for the flower’s center.
- Add five or six oval petals around it.
- Draw a straight or slightly curved stem.
- Add two pointed leaves.
- Color the petals and decorate the background.
Encourage students to draw additional flowers in different sizes to create a garden.
5. Colorful Balloon Drawing
Best for: Ages 4–6
Estimated time: 5–10 minutes
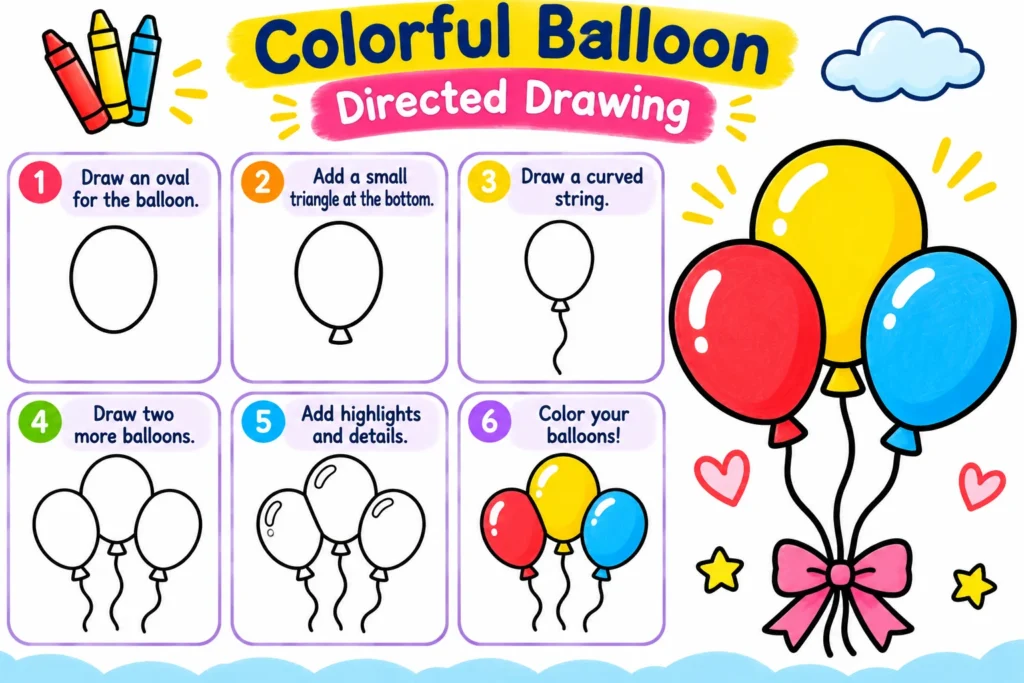
This activity uses a simple oval and a flowing line.
How to draw it:
- Draw a large oval.
- Add a tiny triangle underneath for the balloon knot.
- Draw a long, curved string.
- Repeat the shapes to create more balloons.
- Color each balloon differently.
Children can also draw balloons shaped like hearts or add simple patterns.
6. Cute Ice Cream Cone Drawing
Best for: Ages 5–7
Estimated time: 10–15 minutes
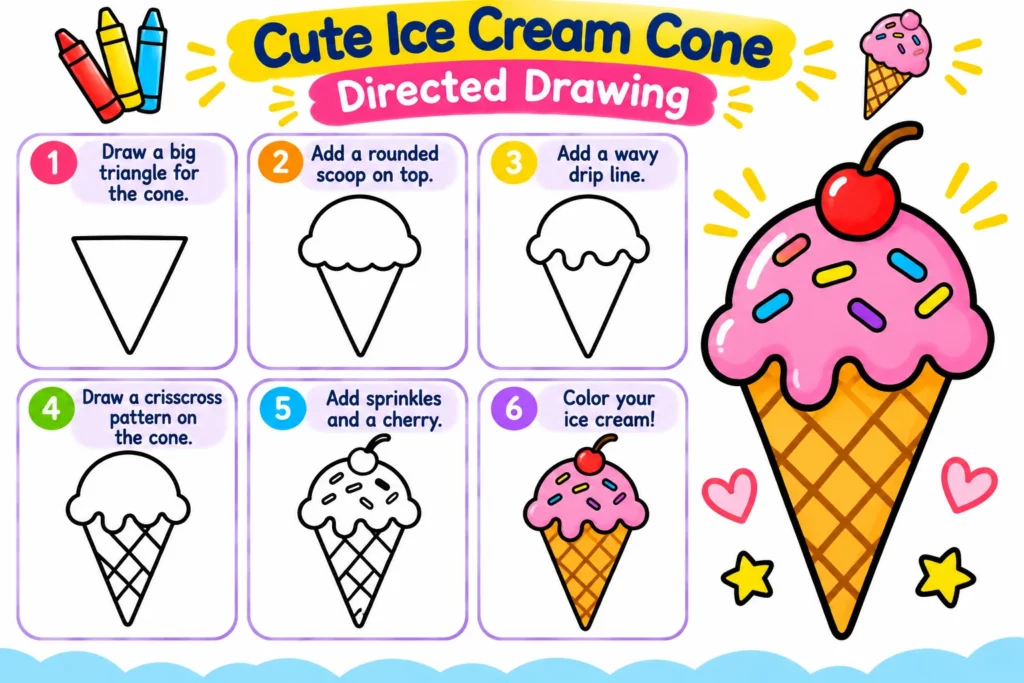
An ice cream cone combines triangles, curved lines, and decorative details.
How to draw it:
- Draw a large triangle pointing downward.
- Add a rounded scoop of ice cream above it.
- Draw a wavy line where the scoop meets the cone.
- Add diagonal lines to create a waffle pattern.
- Decorate with sprinkles or a cherry.
Invite children to invent their own ice cream flavors and give them creative names.
Cute Animal Directed Drawing Ideas
Animals are popular drawing subjects because children can turn simple shapes into familiar, expressive characters.
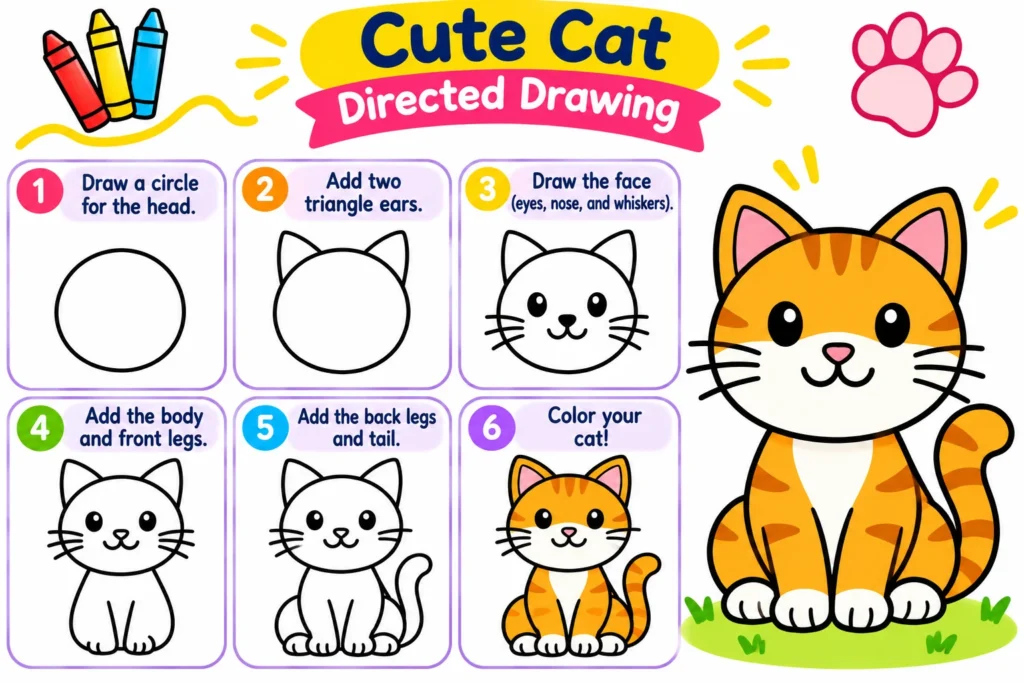
7. Cute Cat Directed Drawing
Best for: Ages 5–8
Estimated time: 10–15 minutes
How to draw it:
- Draw a circle for the cat’s head.
- Add two pointed triangle ears.
- Draw two eyes, a tiny nose, and whiskers.
- Add an oval body and four short legs.
- Finish with a long, curved tail.
Children can choose different fur colors and add stripes, spots, or a collar.
8. Easy Puppy Directed Drawing
Best for: Ages 5–8
Estimated time: 10–15 minutes
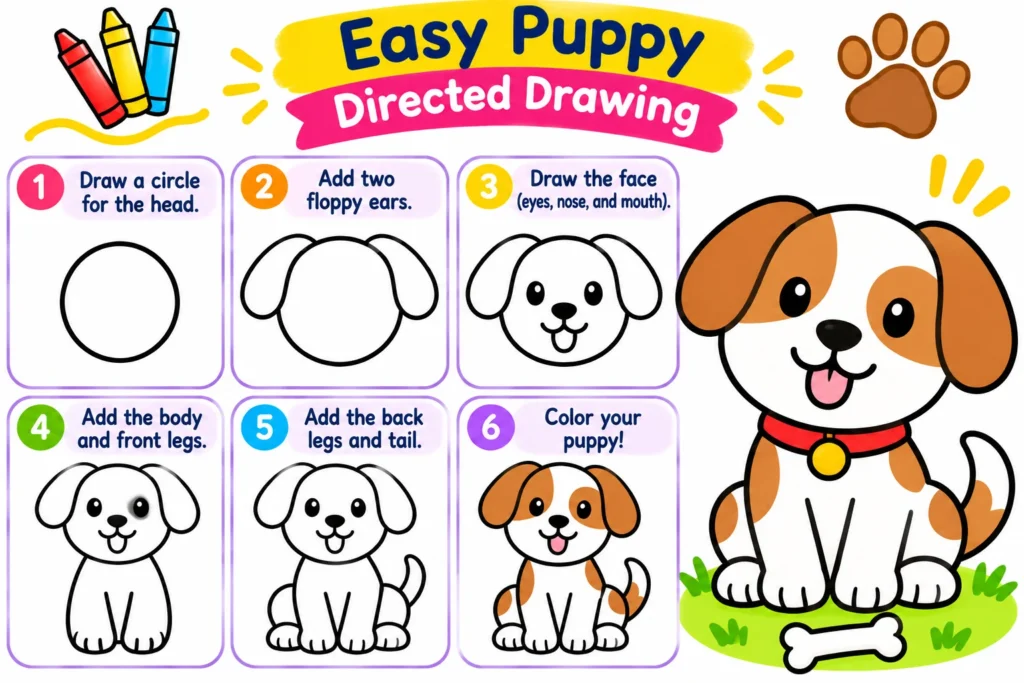
A puppy is a fun choice for children who love pets.
How to draw it:
- Draw a large circle for the head.
- Add two floppy ears.
- Draw two eyes and an oval nose.
- Add a smiling mouth.
- Draw a rounded body with paws and a tail.
For an extra challenge, students can draw a bone, food bowl, or doghouse.
9. Bunny Directed Drawing
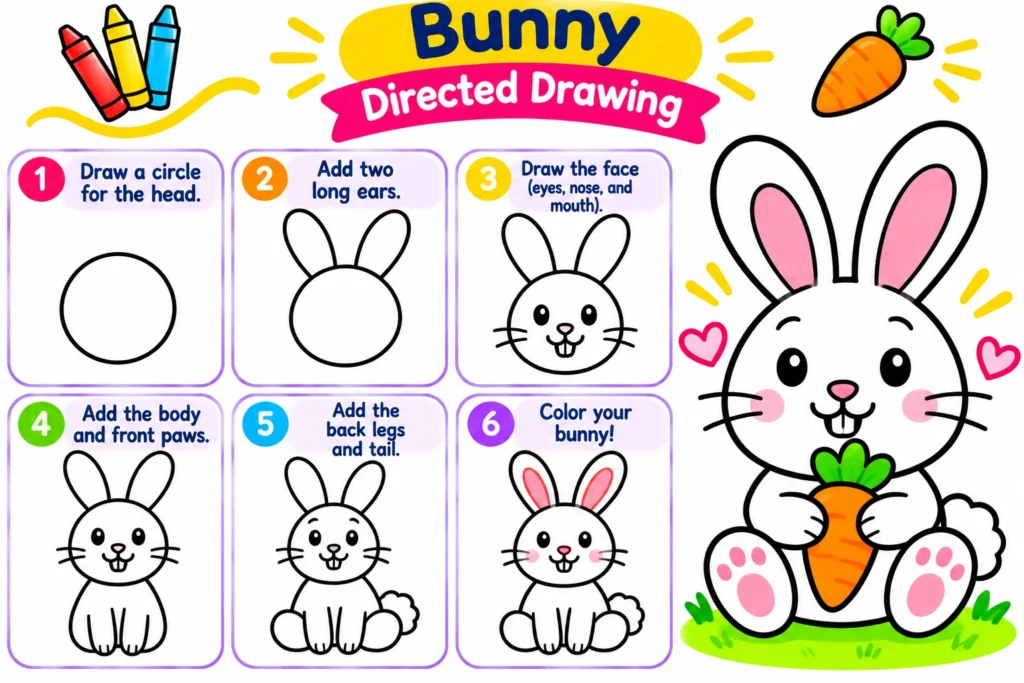
Best for: Ages 4–7
Estimated time: 10 minutes
How to draw it:
- Draw a circle for the head.
- Add two long oval ears.
- Draw a small nose, eyes, and curved mouth.
- Add a rounded body and short feet.
- Finish with a small fluffy tail.
This drawing works well for spring classroom art or an Easter-themed activity.
10. Butterfly Directed Drawing
Best for: Ages 5–9
Estimated time: 15 minutes
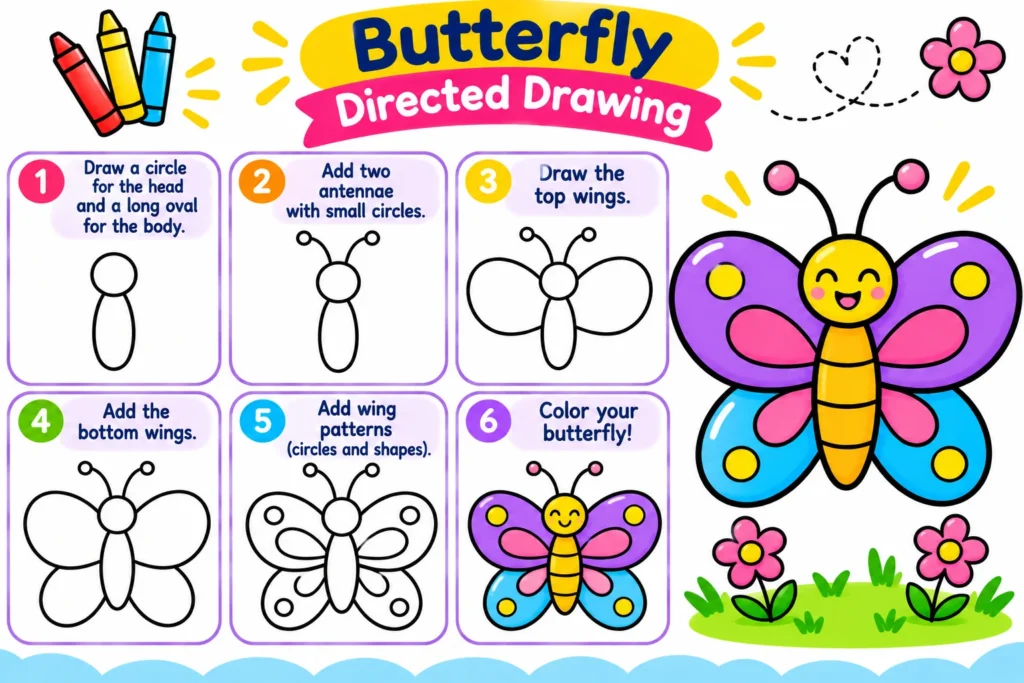
Butterflies offer an enjoyable introduction to symmetry.
How to draw it:
- Draw a long, narrow oval for the body.
- Add a small circle for the head.
- Draw two large upper wings.
- Add two smaller lower wings.
- Draw antennae and decorate both sides with patterns.
Challenge older students to create matching wing designs.
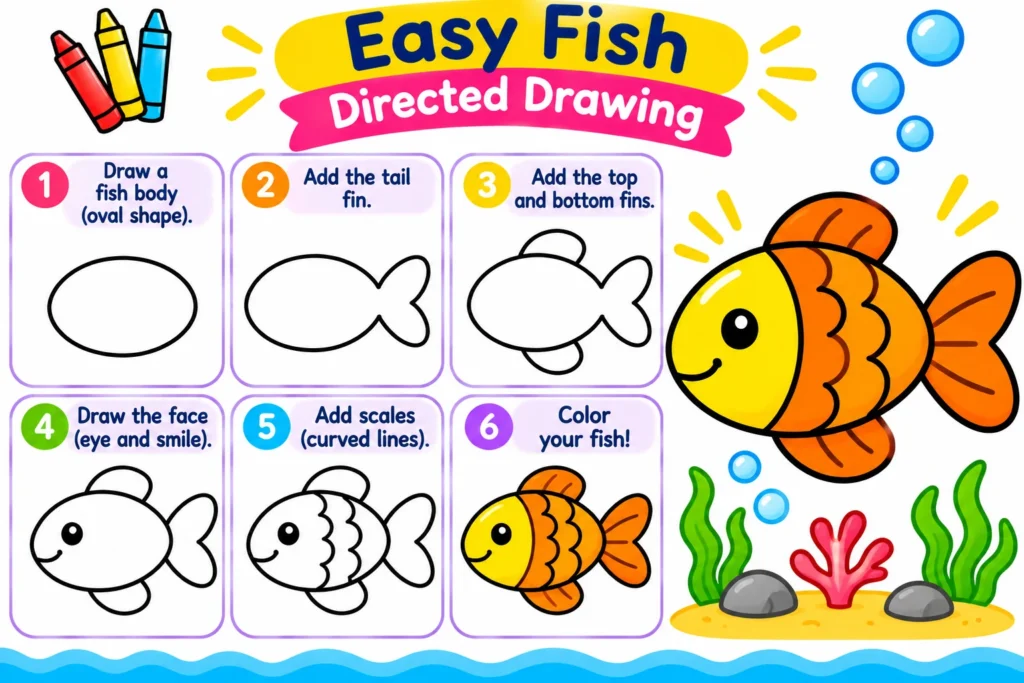
11. Easy Fish Directed Drawing
Best for: Ages 4–7
Estimated time: 10 minutes
How to draw it:
- Draw a large oval for the fish’s body.
- Add a triangle-shaped tail.
- Draw a small fin on the top and bottom.
- Add one eye and a smiling mouth.
- Decorate the body with scales or stripes.
Children can add bubbles, seaweed, shells, and other sea creatures to create an underwater picture.
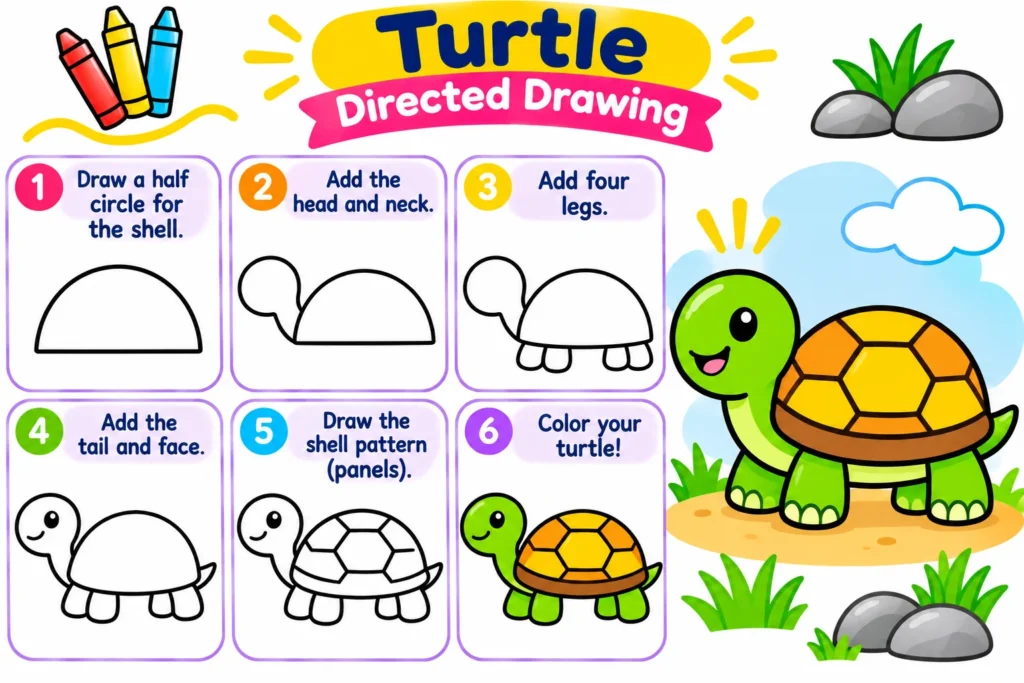
12. Turtle Directed Drawing
Best for: Ages 5–8
Estimated time: 15 minutes
How to draw it:
- Draw a large dome shape for the shell.
- Add a curved line underneath for the turtle’s body.
- Draw a small head extending from one side.
- Add four feet and a tiny tail.
- Decorate the shell with simple geometric patterns.
This project can support a classroom conversation about animal habitats.
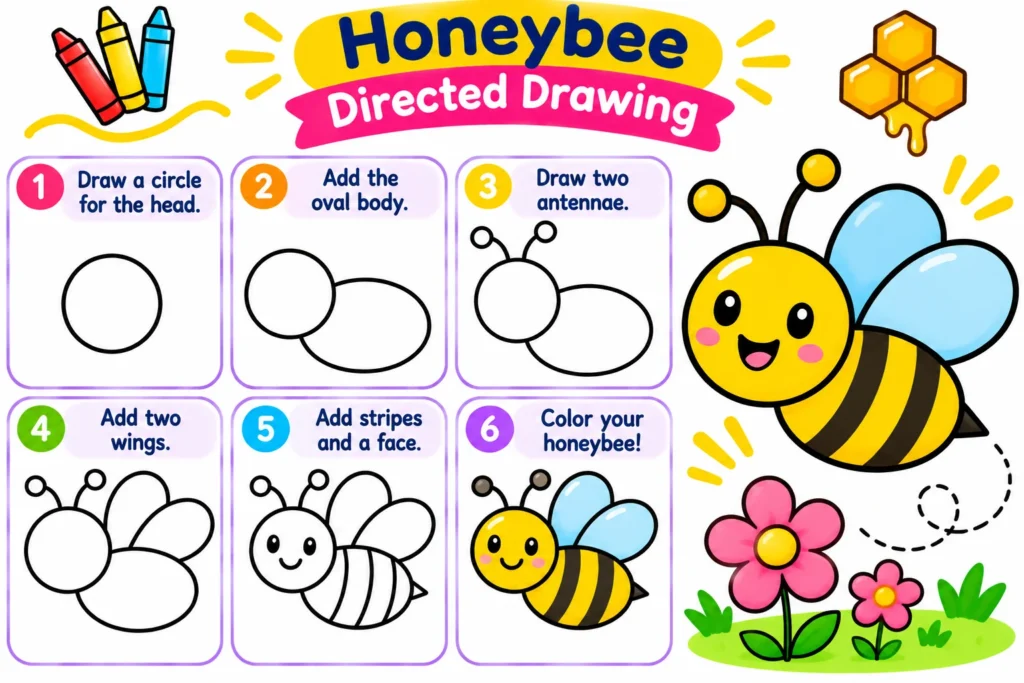
13. Honeybee Directed Drawing
Best for: Ages 5–8
Estimated time: 10–15 minutes
How to draw it:
- Draw an oval body.
- Add a small round head.
- Draw two rounded wings.
- Add antennae and a smiling face.
- Draw stripes across the body and color them yellow and black.
Students can add flowers around the bee and talk about how bees visit flowers.
Fun Directed Drawing Ideas for Elementary Students
Once children become comfortable with basic shapes, they can try more detailed pictures and add imaginative backgrounds.
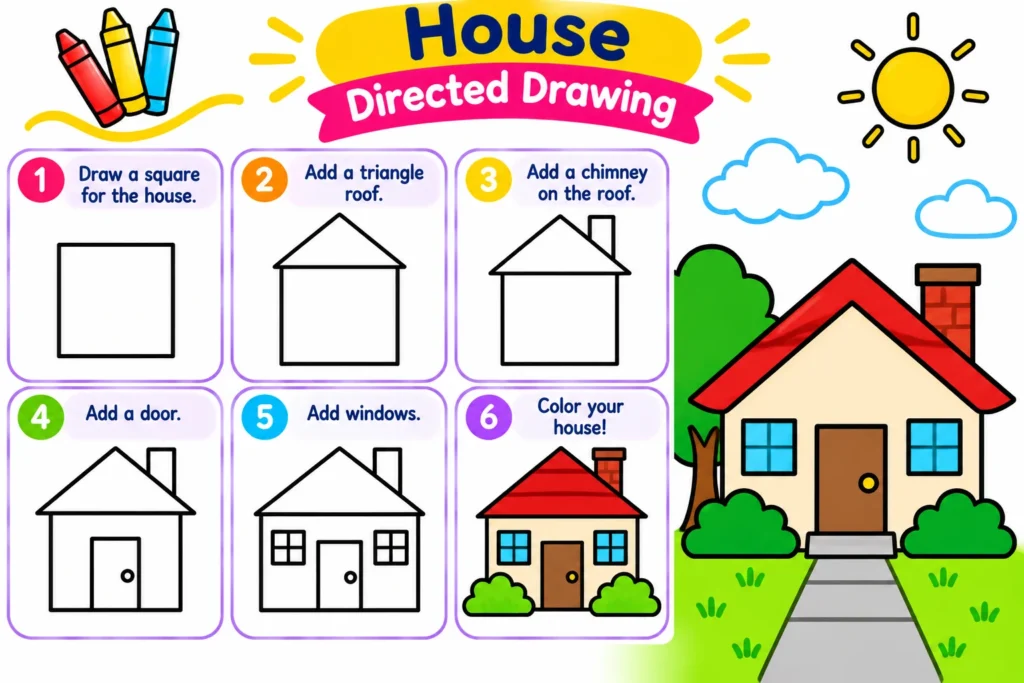
14. House Directed Drawing
Best for: Ages 5–9
Estimated time: 15 minutes
How to draw it:
- Draw a square or rectangle for the house.
- Add a triangle-shaped roof.
- Draw a rectangular door.
- Add square windows.
- Finish with a chimney, pathway, trees, or flowers.
Creative challenge: Encourage children to design a dream house with unusual colors or extra features.
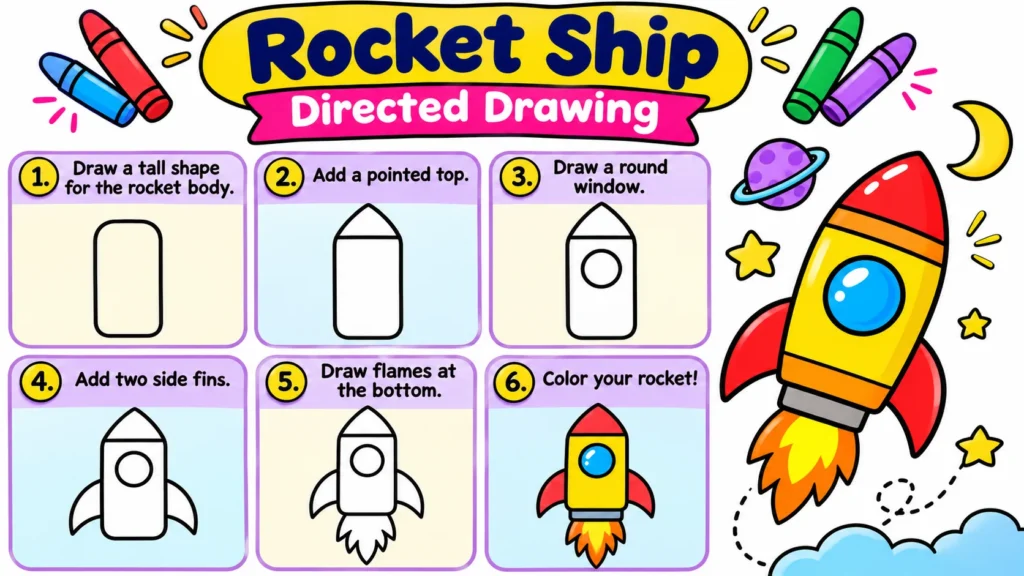
15. Rocket Ship Directed Drawing
Best for: Ages 6–10
Estimated time: 15–20 minutes
How to draw it:
- Draw a tall rectangle with rounded sides.
- Add a pointed top.
- Draw a circular window.
- Add two triangular fins.
- Draw flames below the rocket.
Students can create a space scene with planets, stars, moons, and imaginary galaxies.
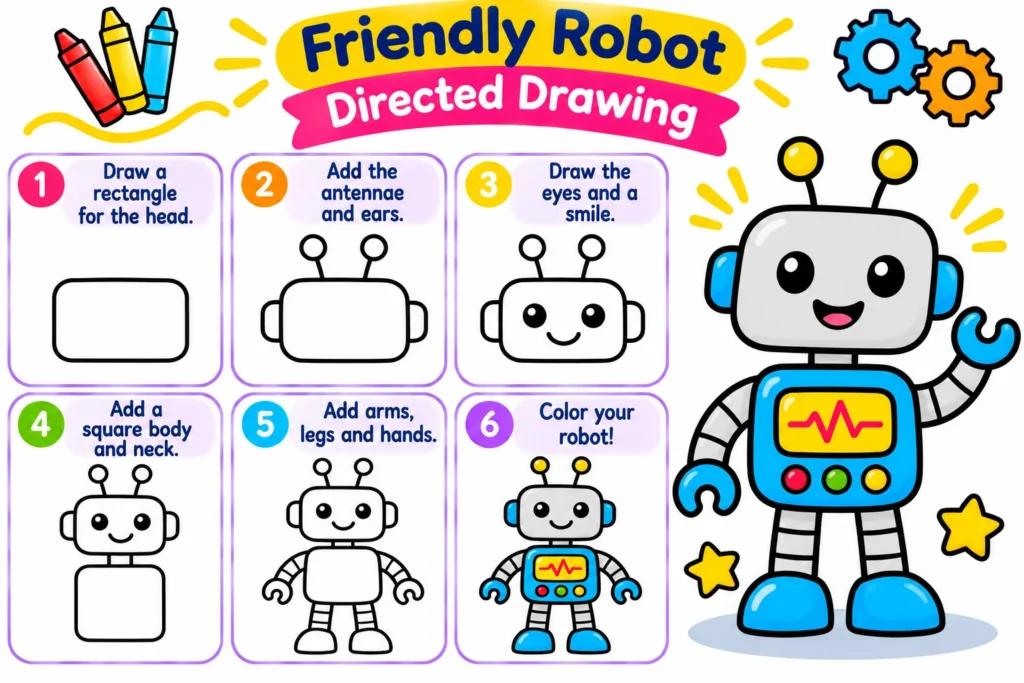
16. Friendly Robot Directed Drawing
Best for: Ages 6–10
Estimated time: 15 minutes
How to draw it:
- Draw a square head.
- Add a larger rectangle for the body.
- Draw two arms and two legs using narrow rectangles.
- Add eyes, buttons, and an antenna.
- Color the robot and decorate it with patterns.
Ask children to invent a name and special job for their robot.
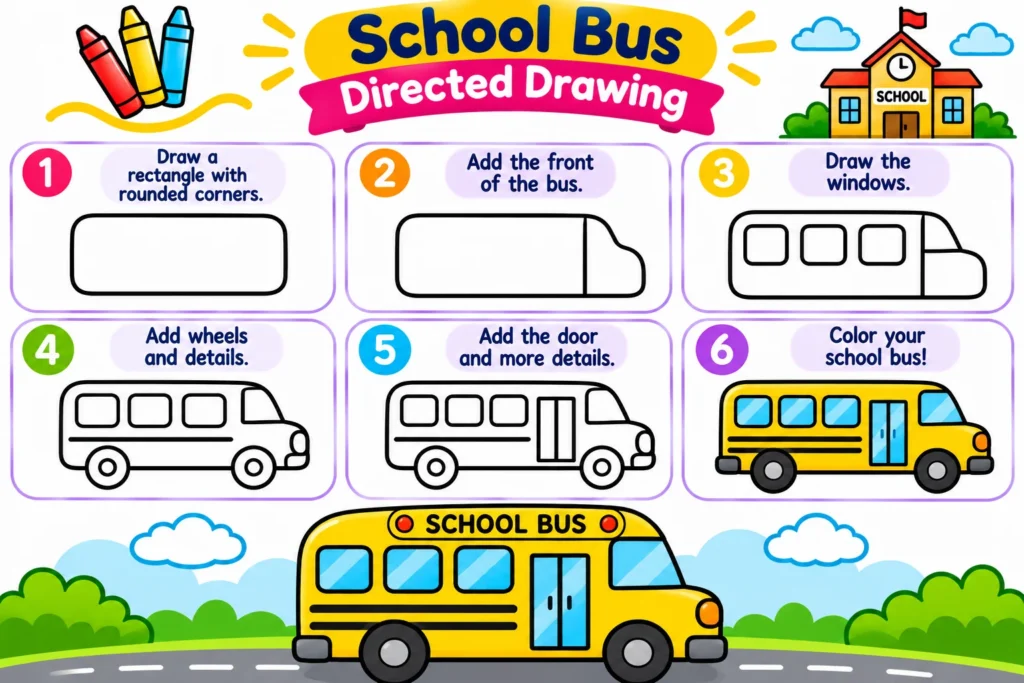
17. School Bus Directed Drawing
Best for: Ages 5–9
Estimated time: 15 minutes
How to draw it:
- Draw a long rectangle for the bus body.
- Round the front corners slightly.
- Add two large wheels.
- Draw rectangular windows and a door.
- Add headlights and color the bus.
This activity is useful for back-to-school art lessons and transportation themes.
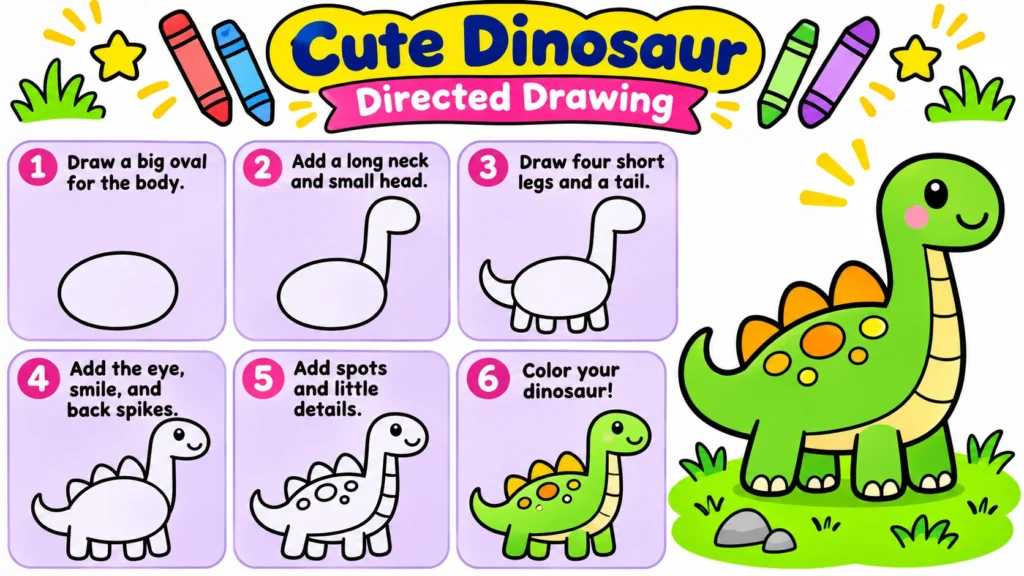
18. Cute Dinosaur Directed Drawing
Best for: Ages 6–10
Estimated time: 15–20 minutes
How to draw it:
- Draw a large oval for the body.
- Extend a curved neck upward.
- Add a small oval head.
- Draw four short legs and a long tail.
- Add eyes, a smile, and decorative spots.
Older students can add a prehistoric landscape with volcanoes, trees, and mountains.
March Directed Drawing Ideas for Kids
March is a great time to introduce seasonal drawing activities. In many U.S. classrooms, March art projects include early spring flowers, rain, kites, and St. Patrick’s Day themes.
These March drawing ideas can work for morning activities, art centers, seasonal classroom displays, or a short creative break.
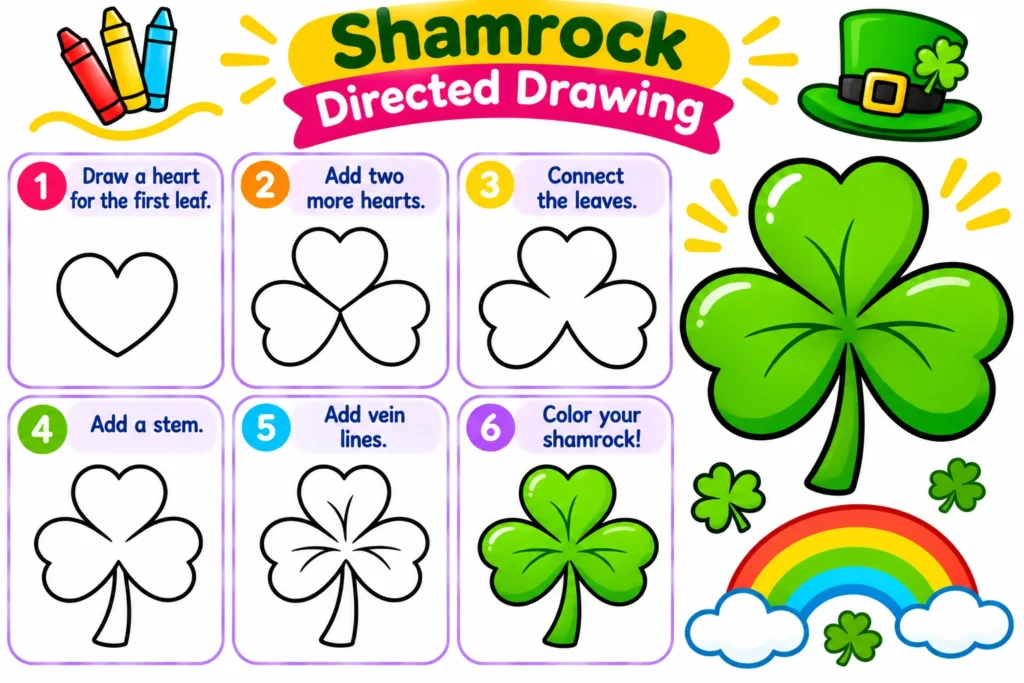
19. Shamrock Directed Drawing
Best for: Ages 5–8
Estimated time: 10 minutes
How to draw it:
- Draw a small heart-shaped leaf.
- Add a second leaf beside it.
- Draw a third leaf underneath.
- Connect the leaves with a short stem.
- Color the shamrock green.
Students can add decorative backgrounds or draw several shamrocks in different sizes.
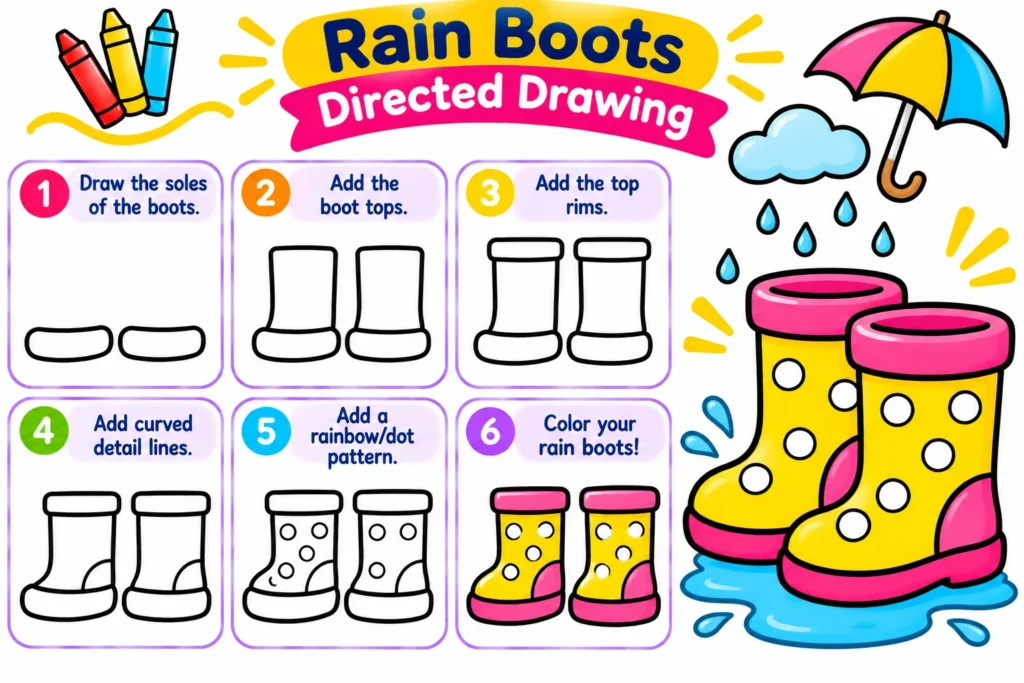
20. Rain Boots Directed Drawing
Best for: Ages 5–9
Estimated time: 15 minutes
Rain boots are a cheerful choice for a spring weather lesson.
How to draw them:
- Draw a tall rectangle with a rounded top.
- Extend the lower section forward to create the boot’s foot.
- Draw a curved line where the sole begins.
- Repeat the shape for the second boot.
- Add patterns, puddles, and raindrops.
Children can create striped, polka-dot, or rainbow-colored boots.
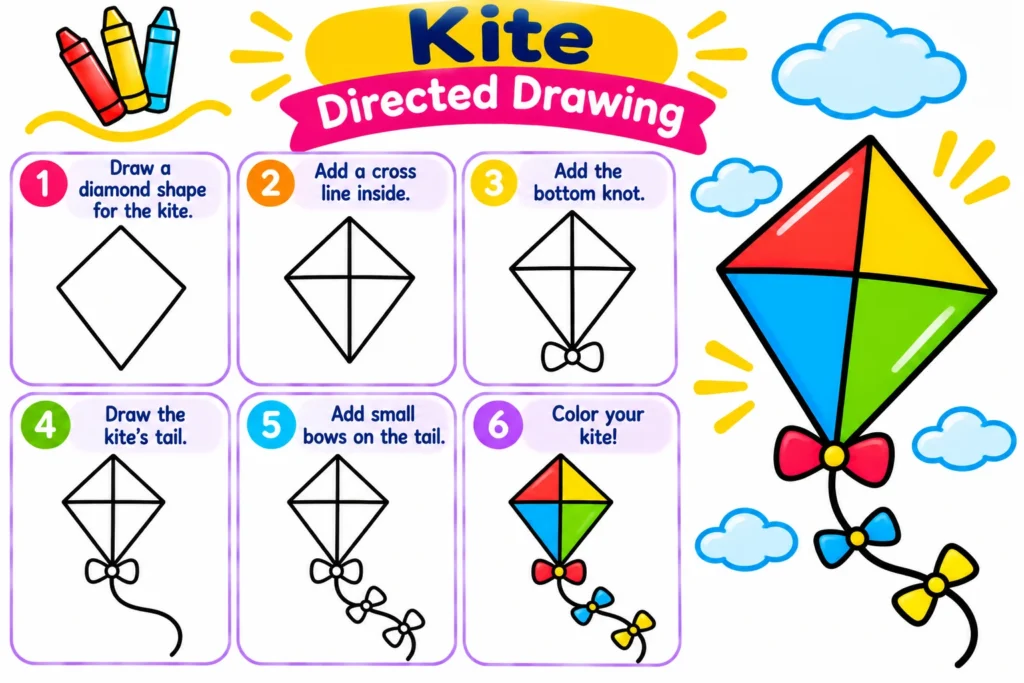
21. Kite Directed Drawing
Best for: Ages 5–8
Estimated time: 10–15 minutes
How to draw it:
- Draw a diamond shape.
- Add a vertical and horizontal line inside the diamond.
- Draw a long, curved string.
- Add small ribbon bows along the string.
- Color the kite and draw clouds in the sky.
This activity lets children experiment with geometric shapes and patterns.
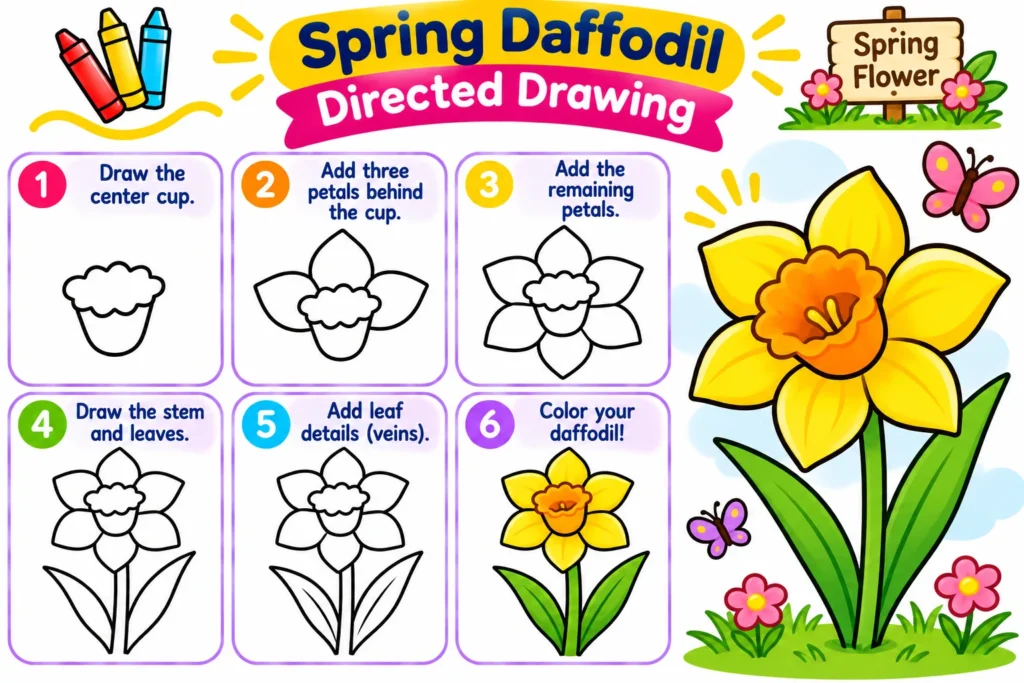
22. Spring Daffodil Directed Drawing
Best for: Ages 6–9
Estimated time: 15 minutes
How to draw it:
- Draw a small oval or trumpet-shaped center.
- Add six pointed petals around the center.
- Draw a long stem.
- Add two narrow leaves.
- Color the flower yellow and the leaves green.
Invite children to add additional flowers, insects, or a spring meadow.
March classroom idea: Combine the four activities into a weekly art routine, with one drawing lesson each week.
Easy Father’s Day Drawing Ideas for Kids
Father’s Day drawing activities provide an opportunity for children to create personalized artwork for dads, grandfathers, stepfathers, or other important caregivers.
These projects work well as handmade cards, keepsakes, and classroom crafts.
23. Easy Dad Portrait Drawing
Best for: Ages 5–10
Estimated time: 15–20 minutes
A portrait of Dad is a meaningful Father’s Day drawing because children can include personal details.
How to draw it:
- Draw a large oval for the face.
- Add ears, eyes, a nose, and a smiling mouth.
- Draw hair, facial hair, or glasses if desired.
- Add a neck, shoulders, and a shirt.
- Color the portrait and decorate the background.
Encourage children to use a photograph or their own memories as inspiration.
They can write a short message beneath the portrait, such as “I Love You, Dad.”
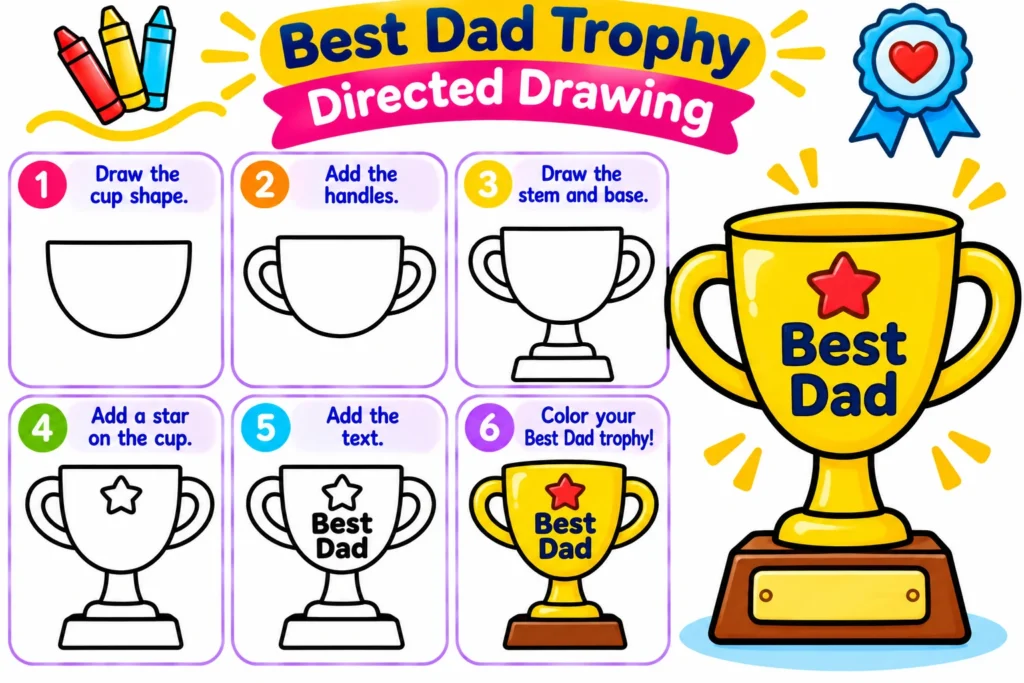
24. Best Dad Trophy Drawing
Best for: Ages 6–9
Estimated time: 15 minutes
This Father’s Day drawing turns simple geometric shapes into a celebratory trophy.
How to draw it:
- Draw a large cup shape.
- Add curved handles on both sides.
- Draw a narrow stem underneath.
- Add a rectangular trophy base.
- Write “Best Dad” on the trophy and color it gold.
Children can personalize the award for someone special in their family.
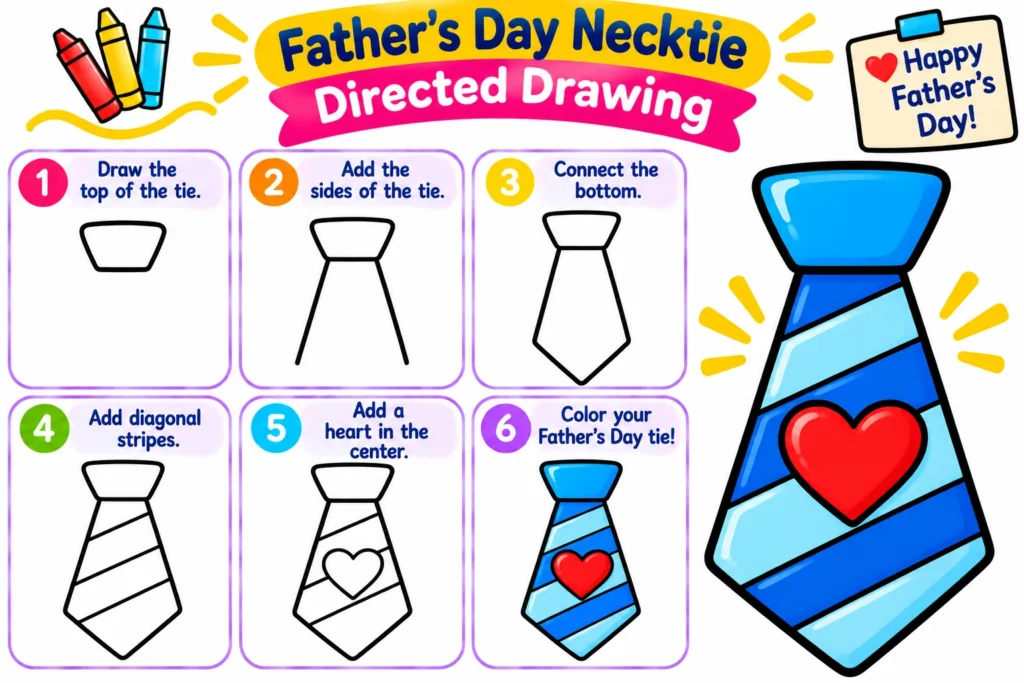
25. Father’s Day Necktie Drawing
Best for: Ages 5–8
Estimated time: 10–15 minutes
How to draw it:
- Draw a small knot shaped like a short trapezoid.
- Add two long lines extending downward.
- Connect the lines with a pointed tip.
- Decorate the tie with stripes, stars, or dots.
- Add a personal message around the drawing.
This simple project also works as a design for a handmade greeting card.
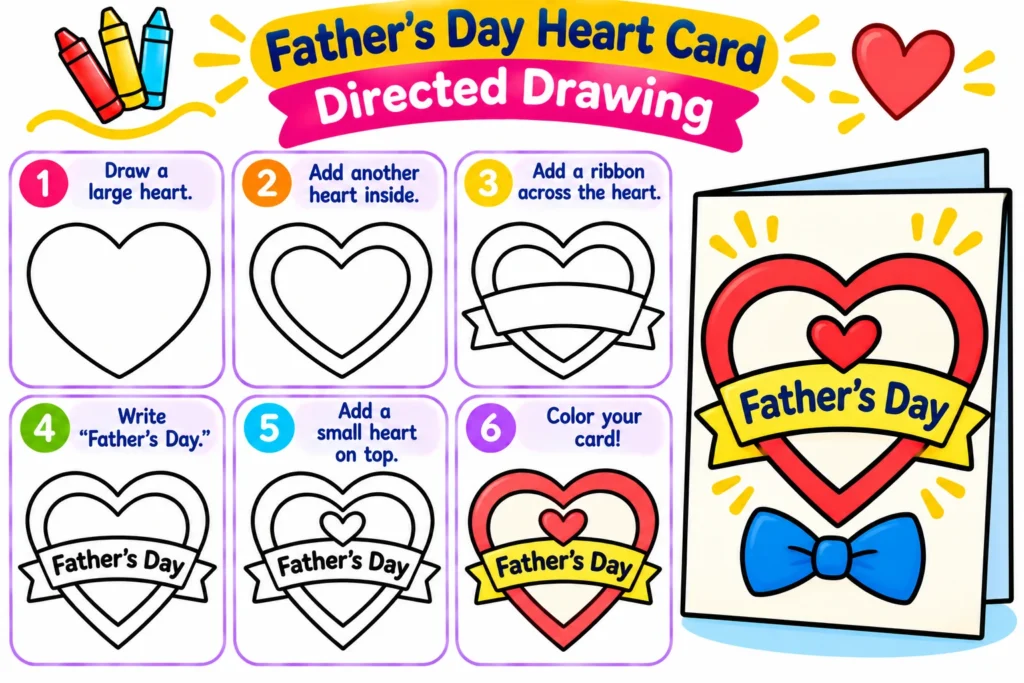
26. Father’s Day Heart Card Drawing
Best for: Ages 4–9
Estimated time: 15 minutes
How to draw it:
- Fold a sheet of construction paper in half.
- Draw a large heart on the front.
- Add smaller hearts, stars, or decorative lines.
- Write a short appreciation message.
- Color the card and add a personal note inside.
Children can write about something they enjoy doing with their dad or another person they appreciate.
Teacher tip: Offer several card-message options so every child can celebrate a caregiver who is important to them.
Easy November Drawings for Kids
November drawing activities are ideal for exploring autumn colors, seasonal changes, harvest themes, and Thanksgiving in classrooms that celebrate it.
The following November drawings use familiar objects and simple instructions suitable for young students.
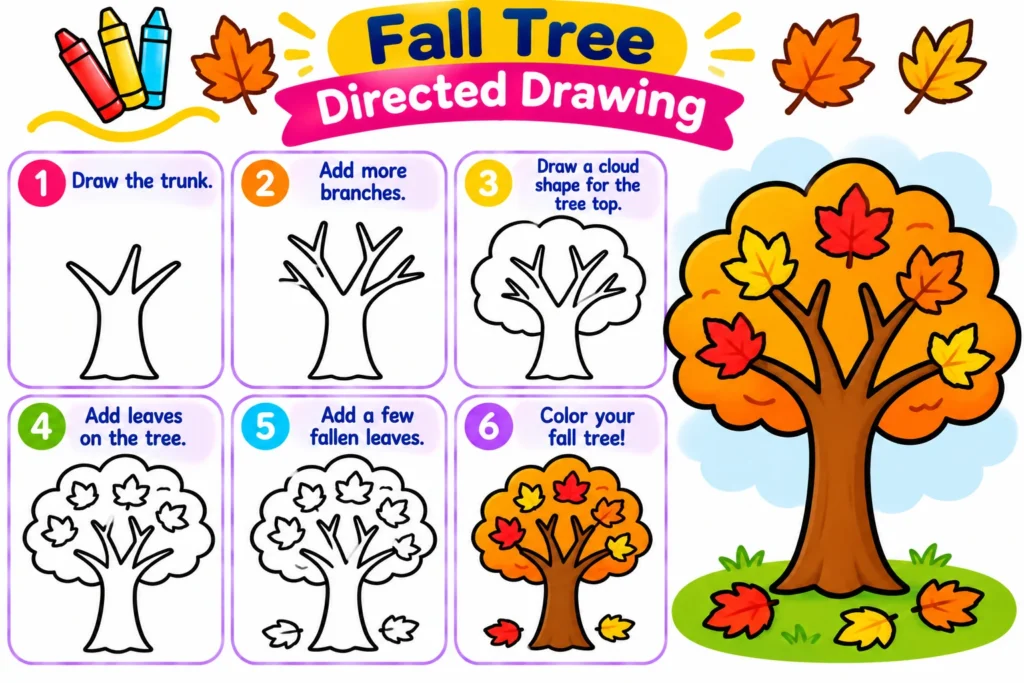
27. Fall Tree Directed Drawing
Best for: Ages 5–9
Estimated time: 15 minutes
How to draw it:
- Draw two slightly curved lines for the trunk.
- Add branches extending upward.
- Draw rounded leaf clusters around the branches.
- Add several falling leaves.
- Color the leaves red, orange, yellow, and brown.
Older children can experiment with overlapping leaves and different textures.
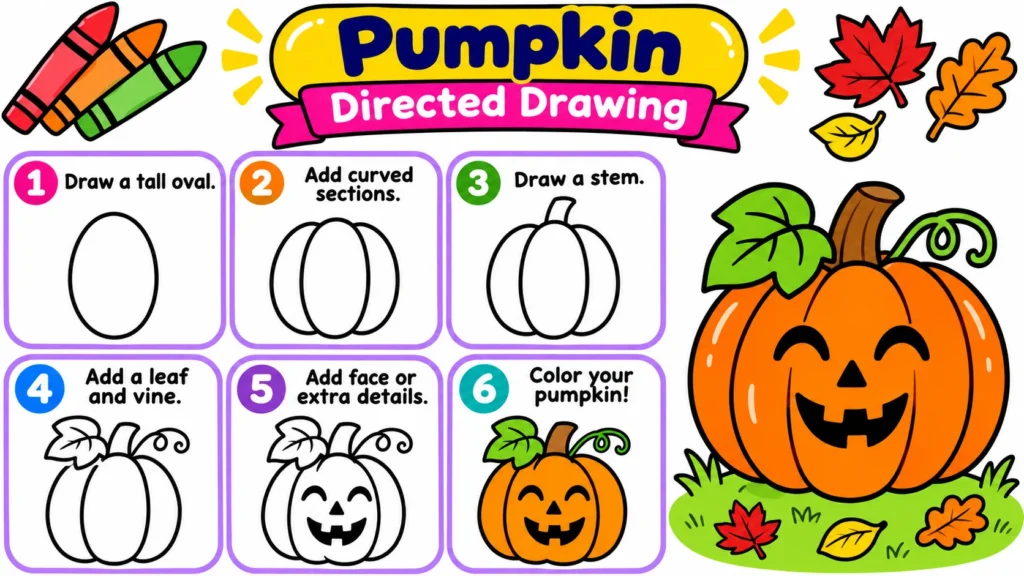
28. Pumpkin Directed Drawing
Best for: Ages 4–8
Estimated time: 10–15 minutes
How to draw it:
- Draw a tall oval.
- Add curved sections on the left and right sides.
- Draw a short stem at the top.
- Add a leaf and curling vine.
- Color the pumpkin orange.
Children can create a pumpkin patch by drawing several pumpkins of different sizes.
29. Turkey Directed Drawing
Best for: Ages 5–9
Estimated time: 15–20 minutes
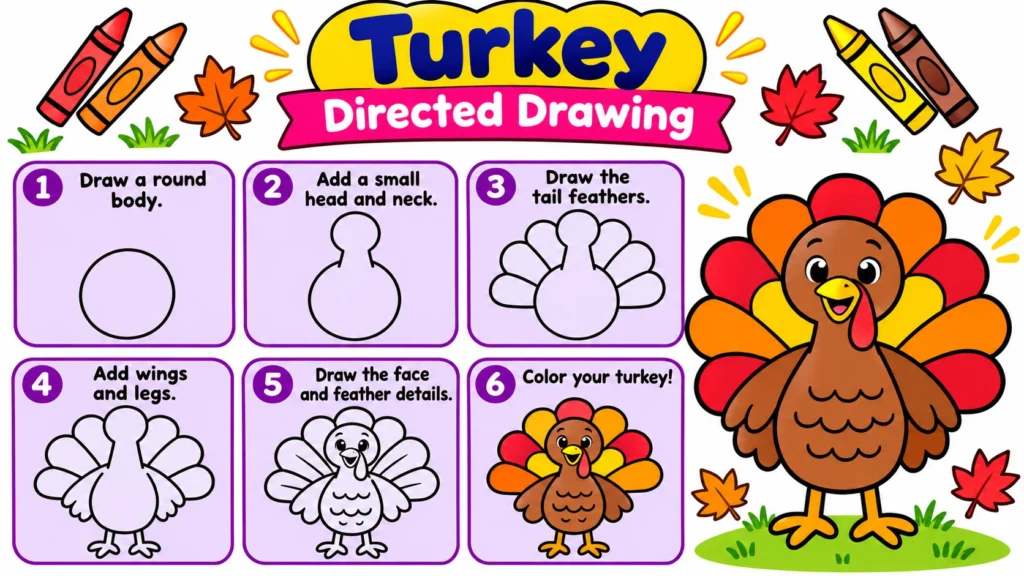
A turkey is a familiar bird and a popular seasonal subject in many U.S. elementary classrooms.
How to draw it:
- Draw a rounded body.
- Add a smaller circle for the head.
- Draw a fan of large feathers behind the body.
- Add two eyes, a small beak, and feet.
- Color the feathers in different autumn shades.
Encourage students to create unique feather patterns and colorful backgrounds.
30. Cute Acorn Directed Drawing
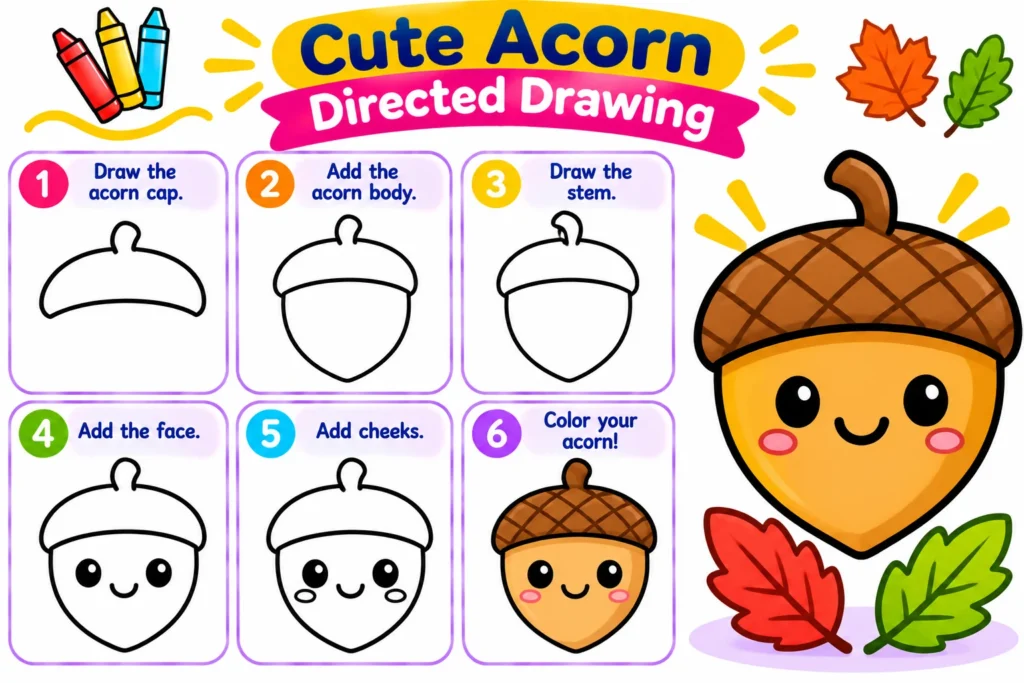
Best for: Ages 4–7
Estimated time: 10 minutes
How to draw it:
- Draw an oval with a slightly pointed bottom.
- Add a curved line across the top.
- Draw a rounded cap above the line.
- Add a short stem and a textured pattern to the cap.
- Color the acorn in shades of brown.
Students can draw several acorns and add a squirrel or fallen leaves.
November classroom idea: Use the pumpkin, autumn tree, turkey, and acorn drawings to create a colorful seasonal bulletin board.
Best Directed Drawing Activities by Age Group
Not every drawing activity will be equally suitable for every child. Use age recommendations as flexible guidance rather than strict rules.
| Age or grade | Recommended activities | Approximate lesson time |
|---|---|---|
| Preschool, ages 4–5 | Sun, cloud, balloon, simple flower | 5–10 minutes |
| Kindergarten, ages 5–6 | Rainbow, cat, fish, bunny, pumpkin | 10–15 minutes |
| First grade, ages 6–7 | Butterfly, puppy, house, kite, shamrock | 10–15 minutes |
| Second grade, ages 7–8 | Robot, turtle, turkey, trophy, daffodil | 15–20 minutes |
| Third–fourth grade, ages 8–10 | Rocket, dinosaur, portraits, detailed landscapes | 15–25 minutes |
Children’s drawing experience varies widely, so allow students to choose simpler or more detailed versions when appropriate.
A Ready-to-Use 15-Minute Directed Drawing Lesson
Teachers can use this short lesson plan for almost any beginner drawing activity.
Lesson topic: Draw a colorful flower
Target group: Kindergarten–second grade
Materials: Drawing paper, pencils, crayons
Minutes 0–2: Introduce the Drawing
Show students a flower or a simple completed example.
Ask: “What shapes can you see in this picture?”
Help children identify the circle, oval petals, straight stem, and pointed leaves.
Minutes 2–7: Draw Together
Demonstrate one step at a time.
Begin with the flower’s center, add the petals, and then draw the stem and leaves. Pause after each step so students can follow along.
Minutes 7–12: Add Color and Details
Let children choose their colors.
Invite them to add grass, sunshine, butterflies, or extra flowers.
Minutes 12–15: Share and Reflect
Ask students to hold up their finished artwork.
Encourage them to explain one creative choice, such as their color combination or background.
Learning objective: Students will use basic shapes to create a recognizable flower and personalize it with colors and details.
How to Use Directed Drawing in the Classroom
Directed drawing works well when teachers connect art activities with daily lessons and classroom routines.
Morning Work or Art Centers
Provide a short picture guide and let students complete a simple drawing independently or with a partner.
Pictures with only a few steps work best for this type of activity.
Reading and Writing Lessons
Ask children to draw a character, animal, or object related to a story.
After completing the drawing, students can write one or two sentences describing their artwork.
For example, after drawing a puppy, a child might write about the puppy’s name, favorite food, and imaginary adventure.
Science Lessons
Use drawings of flowers, insects, weather, or animals to introduce observation and scientific vocabulary.
When drawing a butterfly, for instance, students can identify wings, antennae, and body parts.
Seasonal Classroom Displays
Create monthly displays using spring flowers, summer scenes, autumn trees, and winter animals.
Children can contribute individual artwork to a shared classroom display.
Creative Drawing Challenges
Invite students to complete the same basic drawing and then transform it into an original scene.
For example, after drawing a rocket, one student might create a moon landing while another imagines visiting a colorful new planet.
The focus should be on creative interpretation rather than choosing one child’s picture as the best.
Tips for Teaching Directed Drawing Successfully
Start With Familiar Shapes
Introduce objects that can be broken into circles, triangles, rectangles, and simple curves.
A familiar starting shape can help children understand what comes next.
Keep Instructions Short
Instead of explaining five drawing stages at once, demonstrate one or two lines and allow children time to copy them.
Use clear directions, such as “Draw a circle near the top of your paper.”
Allow Different Drawing Speeds
Some students finish quickly, while others need more time.
Offer optional background details for early finishers without pressuring other children to keep up.
Avoid Constant Corrections
Children’s drawings will naturally differ from the demonstration.
Unless a child asks for help, avoid repeatedly erasing or correcting their work. Encourage them to explore their own artistic choices.
Provide Visual Support
Some students benefit from seeing each step displayed on a board, screen, or printed sheet.
Keep examples large enough to see clearly and reduce unnecessary visual clutter.
Make Activities Accessible
Offer larger paper, easy-grip drawing tools, thicker markers, or fewer steps for children who need additional support.
Children with motor difficulties may benefit from adapted tools, assisted drawing, or additional time.
Encourage Personal Expression
After children finish the main outline, invite them to add patterns, backgrounds, and creative elements that reflect their interests.
A guided drawing should still leave room for imagination.
Common Directed Drawing Challenges and Solutions
| Challenge | Helpful teaching strategy |
|---|---|
| Children say drawing is too difficult | Begin with two or three familiar shapes and demonstrate slowly. |
| Students finish at different speeds | Offer optional coloring, patterns, and backgrounds. |
| A child becomes frustrated by mistakes | Encourage drawing lightly and explain that different results are welcome. |
| Students struggle to follow instructions | Display one step at a time and repeat the demonstration. |
| Drawings look too similar | Provide free-choice coloring and personalization time. |
| Children have difficulty holding drawing tools | Offer larger writing tools, easier grips, or alternative art materials. |
| The activity takes too long | Choose a simpler subject and separate drawing from coloring time. |
How to Make Directed Drawing More Creative
Directed drawing works best when children understand that the demonstrated picture is a starting point, not the only acceptable result.
After completing a drawing, encourage students to explore these creative questions:
- What colors could make your artwork unique?
- Where does your animal or character live?
- What happens in the background?
- Can you add a pattern or an unusual detail?
- What story could your picture tell?
For example, a simple drawing of a cat might turn into a picture of a cat exploring space, playing in a garden, or sitting beside a window.
These small opportunities allow children to practice independent decision-making while using the drawing skills they have just learned.
How to Create Directed Drawing Worksheets for Kids
A simple printable drawing worksheet can help children practice without needing a teacher to demonstrate every stage.
An effective worksheet should include:
- A clear drawing title
- Four to eight numbered picture steps
- Large, readable illustrations
- Simple visual instructions
- Enough space to draw the final picture
- An optional coloring or writing extension
For younger children, use fewer steps and larger illustrations. Older students may enjoy worksheets that include more details or challenging shapes.
Teachers can also provide a blank drawing space beside the instructions so children can refer to each step while completing their work.
Worksheet idea: Create a seasonal directed drawing collection with one activity for each week of the school year.
Frequently Asked Questions About Directed Drawing for Kids
What is directed drawing for kids?
Directed drawing is an art activity in which children follow a series of demonstrated steps to create a picture. Each instruction introduces a simple shape or line that becomes part of the finished drawing.
What are the easiest directed drawing ideas for kindergarten?
Smiling suns, flowers, balloons, rainbows, fish, and simple cats are good beginner choices. These pictures use basic shapes and can usually be completed in a short classroom session.
What are the benefits of directed drawing?
Directed drawing gives children opportunities to practice fine motor control, observing shapes, following instructions, and expressing creativity. It can also help beginners feel more comfortable starting an art project.
How do you teach directed drawing to preschoolers?
Start with a familiar object and demonstrate one basic shape at a time. Use large movements, simple language, and plenty of opportunities for children to practice. Keep lessons short and allow children to personalize their pictures.
What are some easy March drawing ideas?
Popular March drawing ideas include shamrocks, rain boots, kites, rainbows, spring flowers, and daffodils. Teachers can choose subjects that match classroom themes and local seasonal conditions.
What can kids draw for Father’s Day?
Children can create a Dad portrait, a trophy, a patterned necktie, or a heart-shaped greeting card. Personalized artwork featuring shared memories and appreciation messages can make a meaningful gift.
What are good November drawing ideas for kids?
Autumn trees, pumpkins, acorns, squirrels, and turkeys are accessible November drawing subjects. Teachers can connect these pictures with seasonal observations, fall colors, or harvest-themed art activities.
Is directed drawing suitable for first and second graders?
Yes. First and second graders can follow guided drawing lessons that introduce more detailed shapes, animals, vehicles, and simple scenes. The number of steps can be adapted to match each child’s experience.
Does directed drawing limit creativity?
It can feel restrictive if children are required to copy every detail exactly. However, teachers can make directed drawing more creative by allowing children to choose colors, change features, add backgrounds, and invent stories around their artwork.
How long should a directed drawing lesson last?
A simple activity for preschoolers may take approximately 5–10 minutes. Kindergarten and elementary drawing lessons often take 10–20 minutes, with extra time for coloring or creative extensions.
Final Thoughts
Directed drawing for kids is an enjoyable way to introduce art through familiar objects, simple shapes, and manageable instructions. Children don’t need advanced drawing skills or expensive materials to create pictures they can feel proud of.
From smiling suns and friendly animals to March drawing activities, Father’s Day cards, and colorful November artwork, these 30 ideas provide plenty of inspiration for teachers, parents, and homeschool educators.
The most important part of directed drawing is helping children enjoy the process. Give them clear starting points, encourage their individual choices, and celebrate the different pictures they create.
Choose one easy drawing idea, gather a few pencils and crayons, and let your young artists get creative!